
With the Windows 10 Insider Preview Build 18917, the team also ships the first version of the Windows Subsystem for Linux 2 (WSL 2), which was announced at the Microsoft Build 2019 conference. In this post, I am going to show you how you can install WSL 2 on your Windows 10 machine.
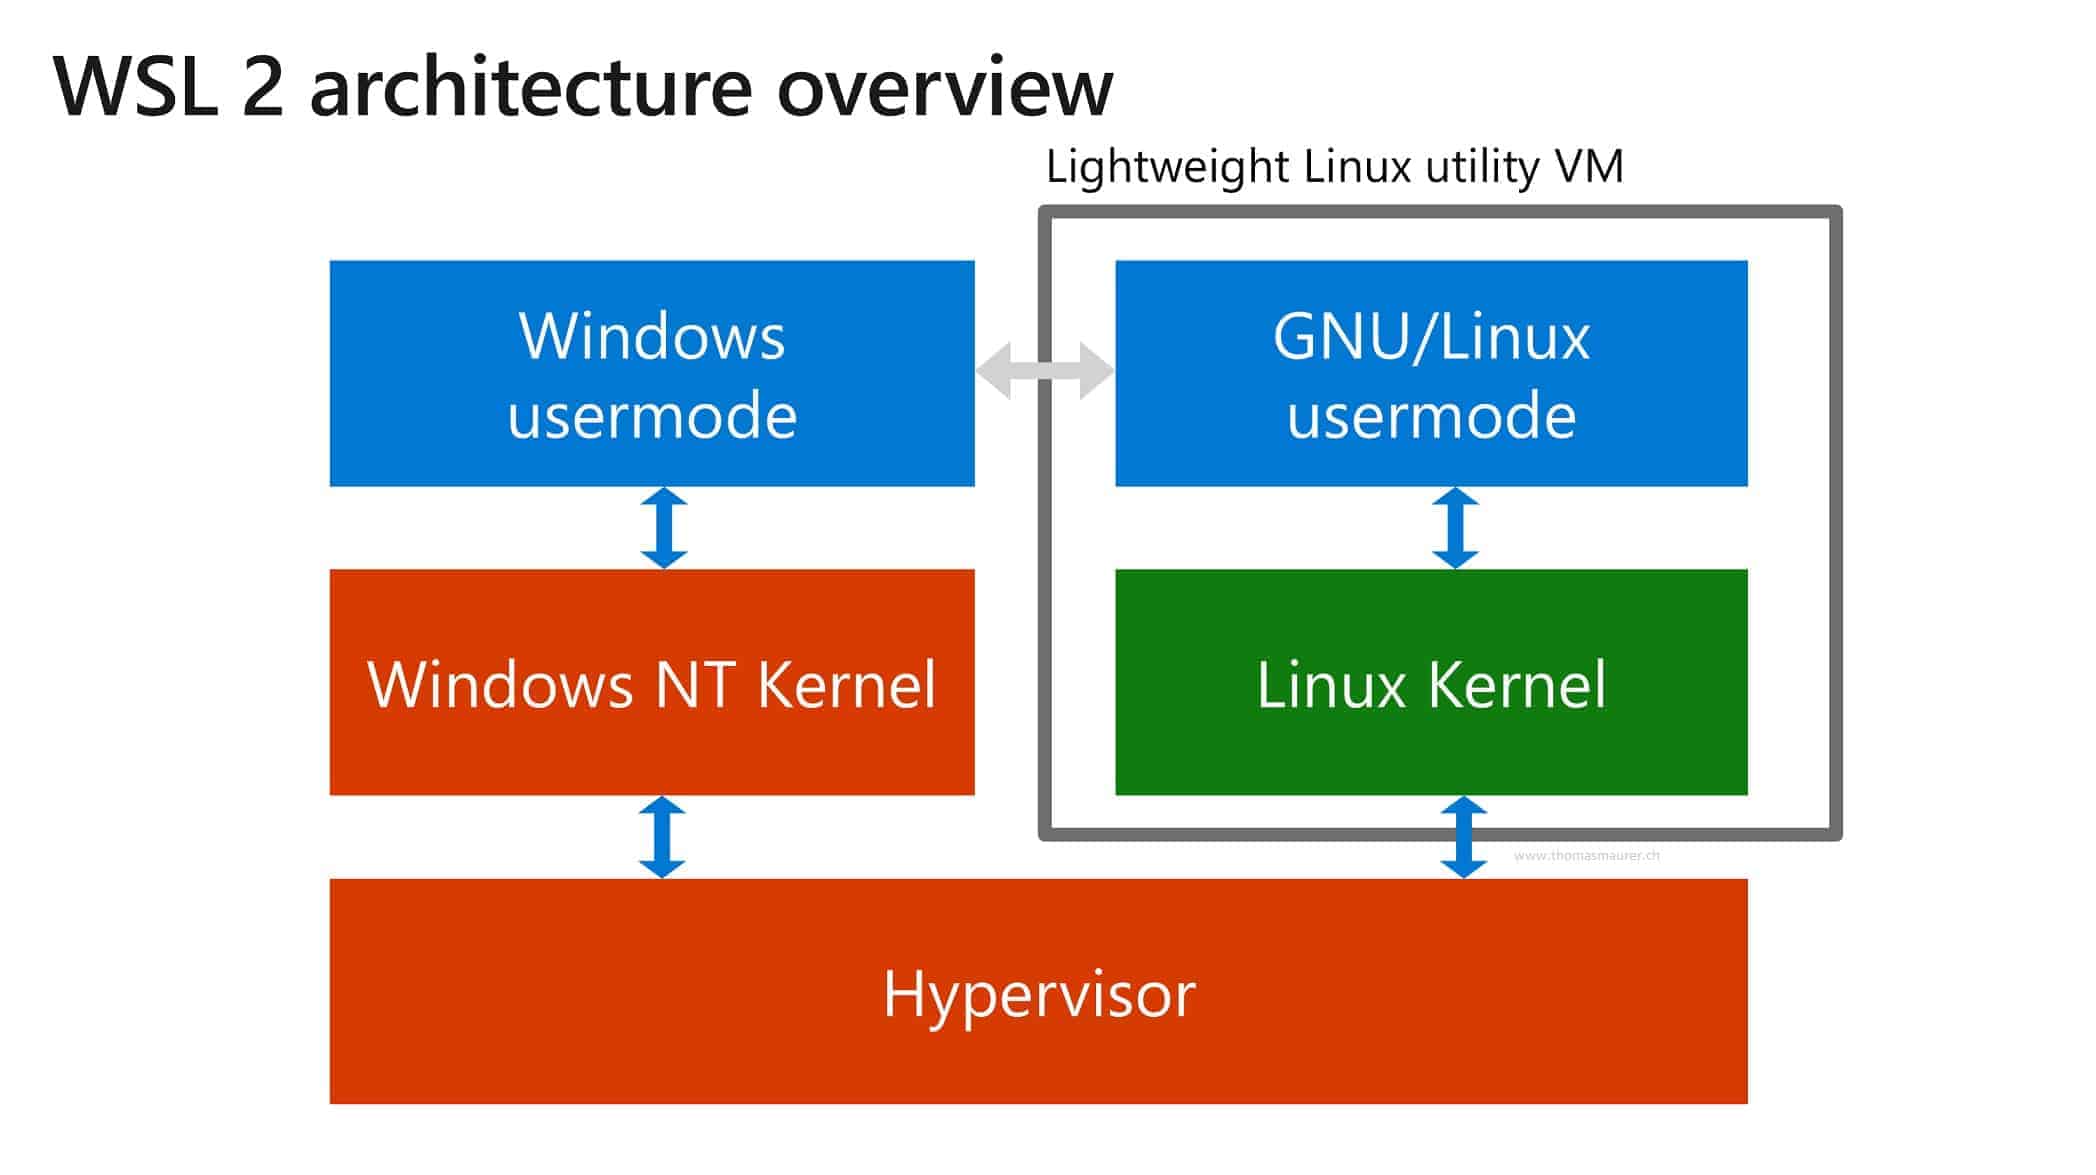
The Windows Subsystem for Linux (WSL 1) was in Windows 10 for a while now and allowed you to use different Linux distros directly from your Windows 10 machine. With WSL 2, the architecture will change drastically and will bring increased file system performance and full system call compatibility. WSL 2 is now using virtualization technology (based on Hyper-V) and uses a lightweight utility VM on a real Linux kernel. You can find out more about WSL 2 in the release blog or on the Microsoft Docs Page for WSL 2.
Requirements
To install WSL 2, you will need the following requirements:
- Windows 10 Insider Preview Build 18917 or higher.
- WSL 2 will be generally available in Windows 10, version 2004, you can read more here.
- A computer that supports Hyper-V Virtualization
Install WSL 2
To install the Windows Subsystem for Linux 2 (WSL 2), you need to follow these tasks.
- Enable the Windows Subsystem for Linux Optional feature (WSL 1 and WSL 2)
- Install a distro for the Windows Subsystem for Linux
- Enable the ‘Virtual Machine Platform’ optional feature (WSL 2)
- Configure the distro to use WSL 2
Enable the Windows Subsystem for Linux
To run the WSL on Windows 10 you will need to install the optional feature:
Enable-WindowsOptionalFeature -Online -FeatureName Microsoft-Windows-Subsystem-Linux
Install a Linux distro for the Windows Subsystem for Linux
If you don’t already have installed a WSL distro, you can download and install it from the Windows 10 store. You can find more here: Crazy times – You can now run Linux on Windows 10 from the Windows Store
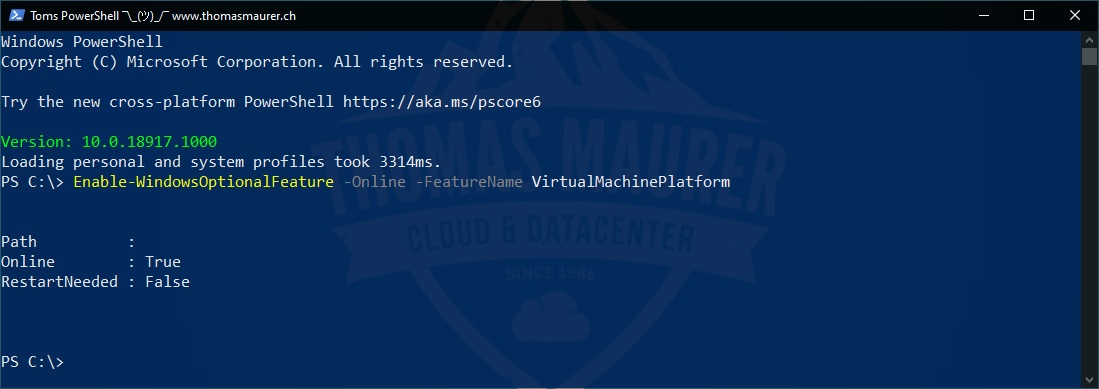
Enable the Virtual Machine Platform feature
WSL 2 Enable Virtual Machine Platform
To make use of the virtualization feature for WSL 2, you will need to enable the optional Windows feature. You can run the following PowerShell command to do this. You will need to start PowerShell as an Administrator. After you run this command, you might need a restart of your computer.
Enable-WindowsOptionalFeature -Online -FeatureName VirtualMachinePlatform
Set WSL distro to use version 2
After you completed the first two steps, you will need to configure the distro to use WSL 2. Run the following command to list the available distros in PowerShell:
wsl -l -v
To set a distro to WSL 2 you can run the following command:
wsl --set-version DistroName 2
You can also set WSL 2 as the default:
wsl --set-default-version 2
To find out more about installing WSL 2, check out the Microsoft Docs page.
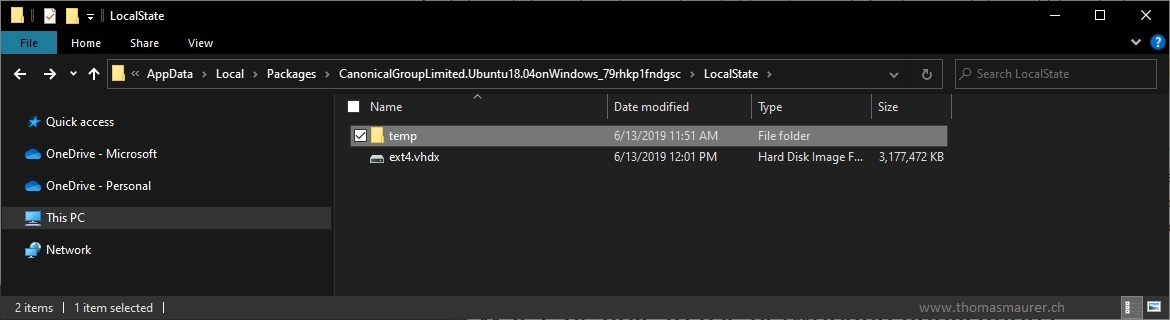
If you are now running your distro using WSL 2, you can now see that there is a Virtual Machine worker process running and if you search a little bit more, you can also find the VHDX file of the distro.
I hope this helps you and gives you a quick overview, if you have any questions, let me know in the comments and check out the WSL 2 FAQ. The Windows Subsystem for Linux 2 Kernel is also open-source, you can follow the project on GitHub.
By the way, you can now also start using Docker Desktop together with the Windows Subsystem for Linux 2.
Tags: configure, Hyper-V, install, Install WSL 2, Microsoft, PowerShell, Virtualization, Windows, Windows 10, Windows Subsystem for Linux, Windows Subsystem for Linux 2, Windows Subystem, WSL, WSL 2 Last modified: June 28, 2020


A bit of a wrinkle for non-admin users. I got WSL2 running fine as administrator (admin@whatever).
But then as my own regular user self (bob@whatever) I failed. So I started Powershell as admin and failed again.
As admin, wsl -l -v was displaying the admin account’s “Ubuntu” box, not my bob user “Ubuntu-18.04” app. I apparently installed two different versions of Ubuntu on each account and that made it obvious that:
1. Unlike the Enable-WindowsOptionalFeature command, the wsl –set-version 2 command does *not* require admin privileges.
2. Using admin privileges creates a confusion in identifying and converting the right distro instance for a non-admin account.
I am not sure that I got all the above right. Just saying the relationship between the permissions requirements, the target distro instance and and the user account seems non-trivial.
I’ll add that it *should not* be necessary to have admin privileges to enable the WSL2 virtual machine. For example, in plain Linux, a qemu instance can be started by anybody.
When you run the ‘wsl –set-version DistroName 2’ as above, the DistroName is a place holder for the actual name of the distro that you get by runnng the ‘wls -l -v’ command. If you copy and paste, you’ll be getting the ‘There is no distribution with the supplied name.’ error ad nauseam.
Can you share the exact syntax? :) Like which distro are you using?
I can’t get it to work. Everything up until the “Set WSL distro to use version 2” section, works without any problems. But non of the other commands work… I only get a list of commands:
C:\Users\***>wsl -l -v
Copyright (c) Microsoft Corporation. All rights reserved.
Usage: wsl.exe [Argument] [Options…] [CommandLine]
Arguments to run Linux binaries:
If no command line is provided, wsl.exe launches the default shell.
–exec, -e
Execute the specified command without using the default Linux shell.
—
Pass the remaining command line as is.
Options:
–distribution, -d
Run the specified distribution.
–user, -u
Run as the specified user.
Arguments to manage Windows Subsystem for Linux:
–export
Exports the distribution to a tar file.
The filename can be – for standard output.
–import
Imports the specified tar file as a new distribution.
The filename can be – for standard input.
–list, -l [Options]
Lists distributions.
Options:
–all
List all distributions, including distributions that are currently
being installed or uninstalled.
–running
List only distributions that are currently running.
-setdefault, -s
Sets the distribution as the default.
–terminate, -t
Terminates the distribution.
–unregister
Unregisters the distribution.
–upgrade
Upgrades the distribution to the WslFs file system format.
–help
Display usage information.
—
Note. I removed my user name.
Looks like you are not running the necessary Windows 10 Insider Preview build for WSL 2. If you want to run you currently need to run a Windows Insider version of Windows 10. https://insider.windows.com?WT.mc_id=thomasmaurer-blog-thmaure
Since you asked for distro, from a previous comment. I am using Ubuntu.
If I just klick on Ubuntu on the Start menu, then it show:
To run a command as administrator (user “root”), use “sudo “.
See “man sudo_root” for details.
***@DESKTOP-Q1R69TF:~$
—
It seems to work, and I didn’t get any error messages doing any of the steps…
That means you are running Ubuntu and WSL is working. However, doesn’t mean that you are running version 2 of WSL.
I have read that you needed at least 18917 Insider version (I am on 1903 Release (18362 Build)). I did add myself to the Insider build list, but I haven’t received any updates, even though I am on the “Fast ring”. I guess that I can only wait and see now?
I retried adding myself to “Fast” and got the 18950 build, and it works now. However Ubuntu didn’t get added to the Windows Terminal drop down menu. Do you know how to add it?
Do you know if WSL 2 will be added to the next Release version of Windows?
Great that you were successful 👍
Thought that it was a part of the terminal and integration with WSL. But apparently you have to do it yourself. Found a guide:
https://windowsloop.com/add-ubuntu-to-windows-terminal/
When will it be out on the Insiders Slow Ring?
Right now slow ring delivers build for 19H2 (Fast Ring is 20H1). So this could take a while until it will be available in Slow ring since there is currently a completely different branch
Merci pour ces renseignements sur WSL je suis sur la version 1903 (18362 Build) comme Canne et vais procéder de la même manière que lui.
J ‘ai cependant une question install en tant que USER ou Admin. les deux ont ils acces à l envirnnement Linux sans soucis de droit ?
MERCI pour votre réponse.
Unfortunately I will not be able to run WSL-2 I suppose since Windows 10 (since several updates and plenty of comments online without any action from Microsoft) does not run on my computer since it is based on the ASUS P6T Delux v2 motherboard unless I disable VT-d (that I assume is required for WSL-2) :-(
My box got 4 core i7 CPU, 48GM RAM, dual SSD, latest graphic board etc and works perfectly but will no longer run latest Windows 10 properly – perhaps M$ is partnering with the hardware manufacturers forcing people to buy new computers even though they existing ones are still ok?!
WSL2 is now on the slow ring! :-) And more details about WSL2 https://myignite.techcommunity.microsoft.com/sessions/81325
Folks,
I have only been using WSL for a week now. Still learning. I have the same problem as Cane above in that wsl -l -v only reports usage information. I expect I only have WSL1. I really would like to see the improvements in file system specifics, and want to try WSL2. I don’t understand the “insider/outsider” ring terminology. What do I need to do to check if I am capable of running WSL2 and how do I install it if I am?
Thank you very much,
Kris
Hi Kris
Great that WSL works for you. So WSL2 is only available in Windows Insider Builds. These are Preview versions of Windows 10 and are designed for early testing. Customers how turn on Windows Insider Builds will get new features, like WSL2 for example. However, since these are Preview builds, they also come with known issues and bugs. So you need to be aware of that. You can find more about the Windows Insider Program here https://insider.windows.com/en-us/.
Great explanation thank you. However the contrast of the page is not really optimal for the code snippets. It took me some time to realize that the powershell commands had ‘-‘ before the ‘Online’ and ‘FeatureName’. The site would be more readable if those characters were darker.
Hi Paul
Thanks for the feedback. I will have a look at that! And see how I can fix it
Very Helpful, Thank You!!
I am also in the same boat with my Windows build not being high enough for WSL2. Any major issues with continuing on with WSL1?
Also, ditto on the above comment about the hyphens (‘-‘) being hard to see in the CL instructions.
Thanks, again!
I am searching for installing linux on windwos 10 and this post is the solution of my problem. Thanks buddy
Great to hear! :)
[…] WSL 2 architecture graphic. (Credit: thomasmaurer.ch) […]
I’m unable to connect to the internet using wsl 2. even when i downgraded to wsl 1 it is not working.
I was able to use wsl 1 with internet access just fine, e.g. ping
this works on the powershell terminal just fine
once i upgraded, i was unable to get this functionality to work, even after uninstalling the ubuntu app and reinstalling it. can advise what would cause the following error?
Temporary failure in name resolution
I found something similar solution on https://windowsclassroom.com/run-linux-on-windows-10/ and i am satisfied with it. But after some days my windows has been very slow. Is it due to linux or it has some other issues?
Ajit Yadav
Dear Thomas Maurer I have found your article so interesting, and, while it opens up a whole new world , I was wondering if your approach is adequate to install WSL2 on “Window Server 2019” too. Could you kindly tell me if Microsoft is giving some guidance about WSL2 Windows Server support from what you already know about this topic?
Thank in advance.
Regards.
Giorgio.
thank you so much for this article, really informative.